

Taillamps, Turn Signal, Stoplamps and Sidemarker Lamps

A. Sidemarker Lamp
B. Stoplamp/Taillamp/Turn Signal Lamp
To replace one of these bulbs:
1. Open the trunk. See Trunk.
2. Remove the convenience net.
3. Remove the plastic wing nuts retaining the trunk trim.
4. Pull back the trunk trim.
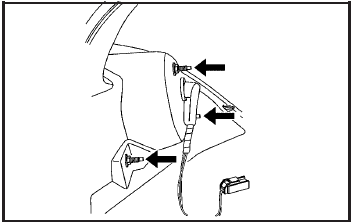
5. Remove the three hex nuts holding the taillamp assembly in place.
6. Pull the taillamp assembly straight out.
7. Turn the bulb socket counterclockwise and pull it straight out to remove it.
8. Pull the old bulb straight out of the socket.
9. Push the new bulb straight in until it clicks.
10. Push the bulb socket in and turn it clockwise to secure it in the taillamp assembly.
11. Push the taillamp assembly straight in to its original location.
When reinstalling the taillamp assembly, make sure the plastic pin on the taillamp assembly lines up and is inserted correctly into the opening of the vehicle.
12. Reinstall the three hex nuts holding the taillamp assembly in place.
13. Put the trunk trim back into place.
14. Reinstall the plastic wing nuts that retain the trunk trim.
15. Put the convenience net back in its original location.
See also:
Interior Glass
To clean, use a terry cloth fabric
dampened with water. Wipe droplets
left behind with a clean dry cloth.
Commercial glass cleaners may be
used, if necessary, after cleaning
the interior glas ...
Perimeter Lights
Press the customization button until PERIMETER
LIGHTS: ON appears in the display. To select
your preference for perimeter lighting, press
the select button while PERIMETER LIGHTS:
ON is displaye ...
Engine Oil Messages
CHANGE ENGINE OIL SOON
This message displays when the engine oil needs to be changed. When you change
the engine oil, be sure to reset the Oil Life System. See Engine Oil Life System
and Dr ...