


Using the Tire Sealant and Compressor Kit without Sealant to Inflate a Tire (Not Punctured)
To use the air compressor to inflate a tire with air only and not sealant:
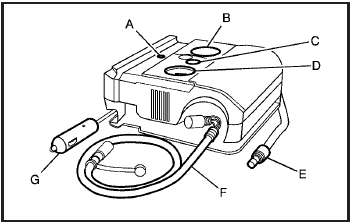
Always do a safety check first. See If a Tire Goes Flat .
1. Remove the tire sealant and compressor kit from its storage location. See Tire Sealant and Compressor Kit Storage.
2. Unwrap the air only hose (E) and the power plug (G).
3. Place the kit on the ground.
Make sure the tire valve stem is positioned close to the ground so the hose will reach it.
4. Remove the tire valve stem cap from the flat tire by turning it counterclockwise.
5. Attach the air only hose (E) onto the tire valve stem by turning it clockwise until it is tight.
6. Plug the power plug (G) into the accessory power outlet in the vehicle. Unplug all items from other accessory power outlets. See Accessory Power Outlet(s).
If the vehicle has an accessory power outlet, do not use the cigarette lighter.
If the vehicle only has a cigarette lighter, use the cigarette lighter.
Do not pinch the power plug cord in the door or window.
7. Start the vehicle. The vehicle must be running while using the air compressor.
8. Turn the selector switch (B) counterclockwise to the Air Only position.
9. Press the on/off (A) button to turn the compressor on.
The compressor will inflate the tire with air only.
10. Inflate the tire to the recommended inflation pressure using the pressure gage (D). The recommended inflation pressure can be found on the Tire and Loading Information label. See Inflation - Tire Pressure.
The pressure gage (D) may read higher than the actual tire pressure while the compressor is on. Turn the compressor off to get an accurate reading.
The compressor may be turned on/off until the correct pressure is reached.
11. Press the on/off button (A) to turn the tire sealant and compressor kit off.
Be careful while handling the tire sealant and compressor kit as it could be warm after usage.
12. Unplug the power plug (G) from the accessory power outlet in the vehicle.
13. Disconnect the air only hose (E) from the tire valve stem, by turning it counterclockwise, and replace the tire valve stem cap.
14. Replace the air only hose (E) and the power plug (G) and cord back in its original location.
15. Place the equipment in the original storage location in the vehicle.
See also:
Automatic Headlamp System
When it is dark enough outside, the Automatic
Headlamp System turns on the headlamps when
the vehicle is started and after the transaxle
has been shifted out of the PARK (P) position.
The headla ...
Loss of Control
Let us review what driving experts say
about what happens when the three control
systems — brakes, steering, and
acceleration — do not have enough friction
where the tires meet the road to do ...
Tire Pressure Monitor
This vehicle may have a Tire Pressure Monitor
System (TPMS).
The Tire Pressure Monitor
alerts you when a
significant reduction in
pressure occurs in one or
more of the vehicle’s tires
...