

RKE without Remote Start Shown
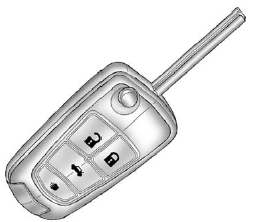
 (Unlock): Press to unlock the driver
door or all doors. See “Auto Door Unlock” under Vehicle Personalization .
(Unlock): Press to unlock the driver
door or all doors. See “Auto Door Unlock” under Vehicle Personalization .
The turn signal indicators may flash and/or the horn may sound to indicate unlocking. See “Remote Unlock Light Feedback” under Vehicle Personalization .
Pressing  will disarm the theft-deterrent
system. See Anti-theft Alarm System .
will disarm the theft-deterrent
system. See Anti-theft Alarm System .
 (Lock): Press to lock all doors.
The turn signal indicators may flash and/or the horn may sound to indicate locking. See “Remote Lock Feedback” under Vehicle Personalization .
If the driver door is open when  is
pressed, all doors lock except the driver door, if enabled through the vehicle personalization.
is
pressed, all doors lock except the driver door, if enabled through the vehicle personalization.
If the passenger door is open when
 is pressed, all doors lock.
Pressing  may also arm the theft-deterrent
system. See Anti-theft Alarm System .
may also arm the theft-deterrent
system. See Anti-theft Alarm System .
 (Remote Trunk Release): Press and
hold to open the trunk.
(Remote Trunk Release): Press and
hold to open the trunk.
 (Vehicle Locator/Panic Alarm): Press
and release one time to locate the vehicle. The exterior lamps flash and the horn
chirps.
(Vehicle Locator/Panic Alarm): Press
and release one time to locate the vehicle. The exterior lamps flash and the horn
chirps.
Press and hold  for at least two
seconds to sound the panic alarm. The horn sounds and the turn signals flash until
for at least two
seconds to sound the panic alarm. The horn sounds and the turn signals flash until
 is pressed again or the vehicle is
started.
is pressed again or the vehicle is
started.
 (Remote Vehicle Start): For vehicles
with this feature, press to operate the remote start feature. See Remote Vehicle
Start for additional information.
(Remote Vehicle Start): For vehicles
with this feature, press to operate the remote start feature. See Remote Vehicle
Start for additional information.
The buttons on the keys are disabled when there is a key in the ignition, if equipped.
See also:
When It Is Time for New Tires
One way to tell when it
is time for new tires is
to check the treadwear
indicators, which will
appear when your tires
have only 1/16 inch
(1.6 mm) or less of tread
remaining. Some
commercial ...
Towing the Vehicle
Notice:
To avoid damage, the
disabled vehicle should be towed
with all four wheels off the
ground. Care must be taken with
vehicles that have low ground
clearance and/or special
equipment ...
Programmable Automatic Door
Locks
Your vehicle is programmed so that, when the doors are
closed, the ignition is on, and the shift lever is moved out
of P (Park), all the doors will lock. The doors will unlock
every time you sto ...