

Using the Tire Sealant and Compressor Kit to Temporarily Seal and Inflate a Punctured Tire
Follow the directions closely for correct sealant usage.
When using the tire sealant and compressor kit during cold temperatures, warm the kit in a heated environment for five minutes.
This will help to inflate the tire faster.
If a tire goes flat, avoid further tire and wheel damage by driving slowly to a level place. Turn on the hazard warning flashers. See Hazard Warning Flashers.
See If a Tire Goes Flat for other important safety warnings.
Do not remove any objects that have penetrated the tire.
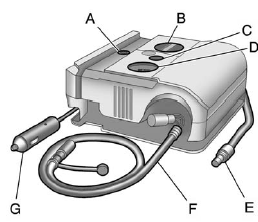
1. Remove the tire sealant and compressor kit from its storage location. See Storing the Tire Sealant and Compressor Kit.
2. Unwrap the sealant/air hose (F) and the power plug (G).
3. Place the kit on the ground.
Make sure the tire valve stem is positioned close to the ground so the hose will reach it.
4. Remove the valve stem cap from the flat tire by turning it counterclockwise.
5. Attach the sealant/air hose (F) onto the tire valve stem. Turn it clockwise until it is tight.
6. Plug the power plug (G) into the accessory power outlet in the vehicle. Unplug all items from other accessory power outlets.
See Power Outlets.
If the vehicle has an accessory power outlet, do not use the cigarette lighter.
If the vehicle only has a cigarette lighter, use the cigarette lighter.
Do not pinch the power plug cord in the door or window.
7. Start the vehicle. The vehicle must be running while using the air compressor.
8. Turn the selector switch (B) clockwise to the Sealant + Air position.
9. Press the on/off button (A) to turn the tire sealant and compressor kit on.
The compressor will inject sealant and air into the tire.
The pressure gauge (D) will initially show a high pressure while the compressor pushes the sealant into the tire. Once the sealant is completely dispersed into the tire, the pressure will quickly drop and start to rise again as the tire inflates with air only.
10. Inflate the tire to the recommended inflation pressure using the pressure gauge (D). The recommended inflation pressure can be found on the Tire and Loading Information label. See Tire Pressure.
The pressure gauge (D) may read higher than the actual tire pressure while the compressor is on. Turn the compressor off to get an accurate pressure reading. The compressor may be turned on/off until the correct pressure is reached.
Notice:
If the recommended
pressure cannot be reached after
approximately 25 minutes, the
vehicle should not be driven
farther. The tire is too severely
damaged and the tire sealant and
compressor kit cannot inflate the
tire. Remove the power plug from
the accessory power outlet and
unscrew the inflating hose from
the tire valve. See Roadside
Assistance Program (U.S. and
Canada) or
Roadside Assistance Program
(Mexico).
11. Press the on/off button (A) to turn the tire sealant and compressor kit off.
The tire is not sealed and will continue to leak air until the vehicle is driven and the sealant is distributed in the tire; therefore, Steps 12–18 must be done immediately after Step 11.
Be careful while handling the tire sealant and compressor kit as it could be warm after usage.
12. Unplug the power plug (G) from the accessory power outlet in the vehicle.
13. Turn the sealant/air hose (F) counterclockwise to remove it from the tire valve stem.
14. Replace the tire valve stem cap.
15. Return the sealant/air hose (F) and the power plug (G) back in their original locations.
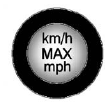
16. If the flat tire was able to inflate to the recommended inflation pressure, remove the maximum speed label from the sealant canister and place it in a highly visible location. Do not exceed the speed on this label until the damaged tire is repaired or replaced.
17. Return the equipment to its original storage location in the vehicle.
18. Immediately drive the vehicle 8 km (5 mi) to distribute the sealant in the tire.
19. Stop at a safe location and check the tire pressure. Refer to Steps 1–11 under “Using the Tire Sealant and Compressor Kit without Sealant to Inflate a Tire (Not Punctured).”.
If the tire pressure has fallen more than 68 kPa (10 psi) below the recommended inflation pressure, stop driving the vehicle. The tire is too severely damaged and the tire sealant cannot seal the tire.
See Roadside Assistance Program (U.S. and Canada) or Roadside Assistance Program (Mexico).
If the tire pressure has not dropped more than 68 kPa (10 psi) from the recommended inflation pressure, use the compressor kit to inflate the tire to the recommended inflation pressure.
20. Wipe off any sealant from the wheel, tire, and vehicle.
21. Dispose of the used sealant canister and sealant/air hose (F) assembly at a local dealer or in accordance with local state codes and practices.
22. Replace it with a new canister available from your dealer.
23. After temporarily sealing a tire using the tire sealant and compressor kit, take the vehicle to an authorized dealer within 161 km (100 mi) of driving to have the tire repaired or replaced.
See also:
Exterior Mirrors
1. Turn the selector switch to L (Left) or R (Right) to choose the driver or
passenger mirror.
2. Move the control to adjust the mirror.
3. Turn the selector switch to to deselect
the mirro ...
Right Front Passenger Position
To learn how to wear the right front passenger’s
safety belt properly, see Driver Position
on page 24.
The right front passenger’s safety belt works the
same way as the driver’s safety bel ...
Interior Lighting
Dome Lamps
The interior lamps control located in the overhead console controls both the front and rear interior lamps.
: Turns the lamps off.
: Turns the lamps on when any door is opened.
: Keeps ...