

Checking the Fluid Level
Prepare your vehicle as follows:
1. Park your vehicle on a level place. Keep the
engine running.
2. With the parking brake applied, place the shift
lever in PARK (P).
3. With your foot on the brake pedal, move the
shift lever through each gear range, pausing
for about three seconds in each range.
Then, position the shift lever in PARK (P).
4. Let the engine run at idle for three minutes
or more.
Then, without shutting off the engine, follow these steps:
1. Flip the handle up and then remove the dipstick and wipe it with a clean rag or paper towel.
The automatic transmission dipstick handle with this symbol on it is located in the engine compartment on the passenger’s side of the vehicle.
2. Reinstall it back in all the way, wait three seconds and then pull it back out again. If the dipstick does not go down the tube easily, turn the blade and try again until it is fully inserted in the tube.
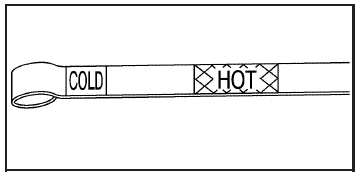
3. Check both sides of the dipstick, and read the
lower level. The fluid level must be in the
COLD area, below the cross-hatched area, for
a cold check or in the HOT or cross-hatched
area for a hot check. Be sure to keep the
dipstick pointed down to get an accurate
reading.
4. If the fluid level is in the acceptable range,
reinstall the dipstick back in all the way;
then flip the handle down to lock the dipstick
in place.
See also:
Power Outlets
The accessory power outlets can be used to plug in electrical equipment, such
as a cell phone or MP3 player.
There is one accessory power outlet located on the instrument panel below the
climate ...
OnStar Steering Wheel Controls
This vehicle may have a Talk/Mute button that can be
used to interact with OnStar hands-free calling. See
Audio Steering Wheel Controls for more
information.
On some vehicles, the mute button c ...
Audio Output
Audio from the DVD player or
auxiliary inputs can be heard
through the following:
• Wireless Headphones
• Vehicle Speakers
The RSE system transmits the
audio signal to the wireless
head ...