

Lap-Shoulder Belt
All seating positions in the vehicle have a lap-shoulder belt.
The following instructions explain how to wear a lap-shoulder belt properly.
1. Adjust the seat, if the seat is adjustable, so you can sit up straight. To see how, see “Seats” in the Index.
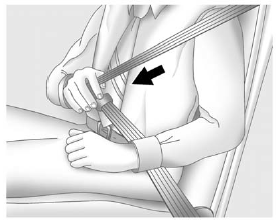
2. Pick up the latch plate and pull the belt across you. Do not let it get twisted.
The lap-shoulder belt may lock if you pull the belt across you very quickly. If this happens, let the belt go back slightly to unlock it. Then pull the belt across you more slowly.
If the shoulder portion of a passenger belt is pulled out all the way, the child restraint locking feature may be engaged. If this happens, let the belt go back all the way and start again.

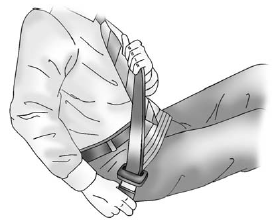
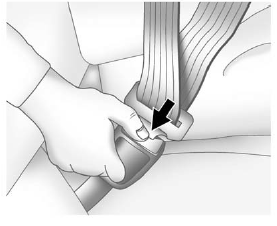
3. Push the latch plate into the buckle until it clicks.
Pull up on the latch plate to make sure it is secure. If the belt is not long enough, see Safety Belt Extender .
Position the release button on the buckle so that the safety belt could be quickly unbuckled if necessary.
If equipped with a shoulder belt height adjuster, move it to the height that is right for you. See “Shoulder Belt Height Adjuster” later in this section for instructions on use and important safety information.
4. To make the lap part tight, pull up on the shoulder belt.
To unlatch the belt, push the button on the buckle. The belt should return to its stowed position.
Before a door is closed, be sure the safety belt is out of the way. If a door is slammed against a safety belt, damage can occur to both the safety belt and the vehicle.
See also:
Air Vents
Use the louvers located on the air
vents to change the direction of the
airflow.
To open the vent, move the
thumbwheel to . To close the vent,
move the thumbwheel to .
For vehicles with eAss ...
Other Information
The Bluetooth® word mark and logos are owned by the
Bluetooth® SIG, Inc. and any use of such marks by
General Motors is under license. Other trademarks and
trade names are those of their respe ...
Door Locks
CAUTION:
Unlocked doors can be dangerous.
• Passengers, especially children, can
easily open the doors and fall out of
a moving vehicle. When a door is
locked, the handle will not open it.
...