

Tire Rotation
Tires should be rotated every 12 000 km (7,500 mi). See Maintenance Schedule.
Tires are rotated to achieve a uniform wear for all tires. The first rotation is the most important.
Any time unusual wear is noticed, rotate the tires as soon as possible and check the wheel alignment. Also check for damaged tires or wheels. See When It Is Time for New Tires and Wheel Replacement.
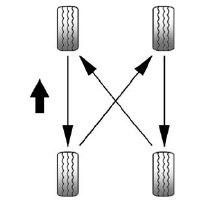
Use this rotation pattern when rotating the tires.
Do not include the compact spare tire in the tire rotation.
Adjust the front and rear tires to the recommended inflation pressure on the Tire and Loading Information label after the tires have been rotated. See Tire Pressure and Vehicle Load Limits.
Reset the Tire Pressure Monitor System. See Tire Pressure Monitor Operation.
Check that all wheel nuts are properly tightened. See “Wheel Nut Torque” under Capacities and Specifications.
WARNING!
Rust or dirt on a wheel, or on the
parts to which it is fastened, can
make wheel nuts become loose
after time. The wheel could come
off and cause an accident. When
changing a wheel, remove any
rust or dirt from places where the
wheel attaches to the vehicle. In
an emergency, a cloth or a paper
towel can be used; however, use
a scraper or wire brush later to
remove all rust or dirt.
Lightly coat the center of the wheel hub with wheel bearing grease after a wheel change or tire rotation to prevent corrosion or rust build-up. Do not get grease on the flat wheel mounting surface or on the wheel nuts or bolts.
See also:
Loss of Control
Let us review what driving experts say about what happens when the three control systems—brakes, steering, and acceleration—do not have enough friction where the tires meet the road to do what the ...
Climate Control Influence on eAssist Operation and Fuel Economy (If
Equipped)
The climate control system is
dependent upon other vehicle
systems for heat and power input.
Certain climate control settings can
lead to higher fuel usage and/or
fewer auto stops.
The follo ...
Customer Assistance Offices (Mexico)
To contact the Customer Assistance
Center (CAC), use the phone
numbers listed in this section.
Customer assistance is available
Monday through Friday, 08:00 to
20:00 hours, and Saturdays from ...