


Overview (Radio with CD)
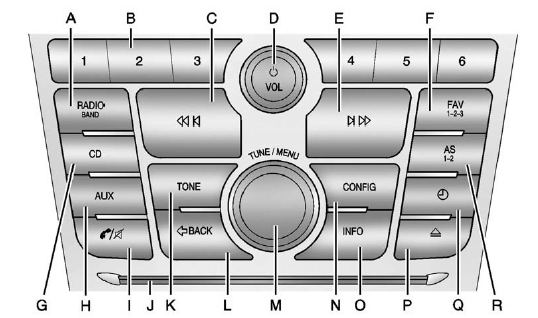
Overview (Radio with CD)
A. RADIO/BAND
- Changes the band while listening to the radio.
- Selects the radio when listening to a different audio source.
B. Buttons 1−6
- Radio: Saves and selects favorite stations.
C.  (Previous/Reverse)
- Radio: Seeks the previous station.
- CD: Selects the previous track or rewinds within a track.
D.  (Power/Volume)
- Turns the system on or off and adjusts the volume.
E.  (Next/Forward)
- Radio: Seeks the next station.
- CD: Selects the next track or fast forwards within a track.
F. FAV 1-2-3 (Favorites Page)
- Radio: Opens the favorites list.
G. CD
- Selects the CD player.
H. AUX (Auxiliary)
- Selects an external audio source.
I.  (Phone/Mute)
- Opens the phone main menu.
- Mutes the audio system.
J. CD Slot
- Insert a CD.
K. TONE
- Opens the tone menu.
L. / BACK
- Menu: Moves one level back.
- Character Input: Deletes the last character.
M. TUNE/MENU
- Turn to open menus, highlight menu items, or set numeric values while in a menu.
- Press to select menu items.
- Radio: Manually selects radio stations.
- CD: Selects tracks.
N. CONFIG (Configuration)
- Opens the settings menu.
O. INFO (Information)
- Radio: Shows available information about the current station.
- CD: Shows available information about the current track.
P.  (Eject)
- Removes a disc from the CD slot.
Q.  (Clock)
- Opens the clock menu.
R. AS 1-2 (Autostore)
- Radio: Opens the auto store stations list.
See also:
When to Check Power Steering Fluid
It is not necessary to regularly check power steering fluid
unless you suspect there is a leak in the system or
you hear an unusual noise. A fluid loss in this system
could indicate a problem. H ...
Immobilizer Operation
This vehicle has a passive theft-deterrent system.
The system does not have to be manually armed or disarmed.
The vehicle is automatically immobilized when the key is removed from the ignition.
The ...
Removal and Installation of the Sealant
Canister
To remove the sealant canister:
1. Remove the plastic cover.
2. Unscrew the connector (B) from the canister (A).
3. Pull up on the canister (A) to remove it.
4. Replace with a new canister which ...