

Head Restraint Removal and Reinstallation
The rear outboard head restraints can be removed if they interfere with the proper installation of the child restraint.
To remove the head restraint:
1. Partially fold the seatback forward. See Rear Seats for additional information.
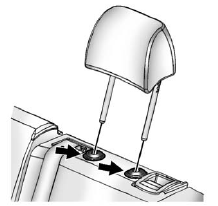
2. Press both buttons on the head restraint posts at the same time, and pull up on the head restraint.
3. Store the head restraint in the trunk of the vehicle.
4. When the child restraint is removed, reinstall the head restraint before the seating position is used.
WARNING!
With head restraints that are not
installed and adjusted properly,
there is a greater chance that
occupants will suffer a neck/spinal injury in a crash. Do not
drive until the head restraints for
all occupants are installed and
adjusted properly.
To reinstall the head restraint:
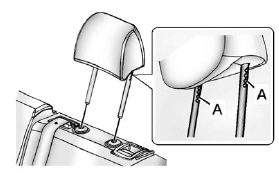
1. Insert the head restraint posts into the holes in the top of the seatback. The notches (A) on the posts must face the driver side of the vehicle.
2. Push the head restraint down.
If necessary, press the height adjustment release button to further lower the head restraint.
See Head Restraints.
3. Try to move the head restraint to make sure that it is locked in place.
See also:
How to Reset the Engine Oil Life
System
The Engine Oil Life System calculates when to change
the engine oil and filter based on vehicle use. Whenever
the oil is changed, reset the system so it can calculate
when the next oil change is ...
Compass
The vehicle has a compass display in the DIC. See Compass for more information. ...
Customer Satisfaction Procedure
Your satisfaction and goodwill are important to your dealer and to Buick. Normally, any concerns with the sales transaction or the operation of the vehicle will be resolved by your dealer's sales or s ...